Wednesday, October 18, 2017

Sitecore 9 Forms : translating error messages

Sitecore 9 Experience Forms

Sitecore released a successor for Web Forms for Marketers (WFFM) with the new Sitecore 9 version, called Sitecore Forms.

In a multilingual environment you want to translate your forms, which is easy as the form editor itself has a language switch.  But what about the error messages - those things a visitor gets when (s)he fills in the form not as expected...

Translating error messages

Find the validators in the Sitecore Content Editor: /sitecore/system/Settings/Forms/Validations

Each validator has a Message field. Create versions of the validator item in all the languages needed and fill (or update) the message field as desired. Just check that the message is valid: the parameters in the text need to match the original value. As in the example (image) for email there is "{0}". A developer will recognize this syntax - all translations do need this token as it will be replaced by the field name when displaying the error.

Client-side messages

The messages entered here will be used for client- and server-side error messages. Which is nice. Just be aware that somewhere also jquery validation gets used and that can lead to strange situations. I noticed that the email validation can give two different error messages depending on what the error is.. and one of them is not translated as it comes from jquery. 

Translating the jquery validation is out of scope here as that is documented elsewhere and is not related to the Sitecore solution. Update: https://ggullentops.blogspot.com/2019/04/sitecore-9-forms-translating-client-error.html ;)

Required field

You might notice that the most used validation - required field - is not in the list. That is because this is a special case.. also on a Forms field, you would not select a required validator, but just tick the required checkbox. 

The code for the required field validation works in a different way and the message will come from the Sitecore dictionary. If you want to update or translate it, you need to add a key to that Dictionary. This can be done in the master database - just add an item in the /system/Dictionary - the name doesn't really matter. The key however needs to be exactly "{0} is required.". The phrase can be anything you want, just remember to add the {0} token. 

Create versions and translate in all languages needed - and don't forget to publish.

Update - password/email confirmation fields

As new fields got added in newer versions (9.3) - some new translation requirements were found. AS asked in the comments, the password & email confirmation fields seem to be special cases as well. How to translate them was mentioned on Sitecore StackExchange (https://sitecore.stackexchange.com/q/24129/237): just add "The {0} and {1} do not match." to the dictionary as well.

Sitecore 9 Forms: custom submit action

Sitecore 9 Experience Forms

Sitecore released a successor for Web Forms for Marketers (WFFM) with the new Sitecore 9 version, called Sitecore Forms.

Submit actions - save actions

Sitecore Forms comes with a few submit actions (or save actions as we used to call them, or how they are still called on the submit button) out of the box like Trigger Goal, Redirect to Page, Save Data ... but is also missing a few and developers will probably -just as with wffm- need to make custom ones.

Custom redirect

I wrote a post on Sitecore 8 about customizing the redirect url. In Sitecore 9 with Forms, that article is no longer valid as we should use a different approach and use a custom submit action. So lets try to do that: create a submit action that redirects to a page and adds the value of a field (e.g. email) to the querystring to be processed on the results page.
Could become useful as there is no ootb option for a success message anymore.


The code

Let's go straight to the good stuff. We'll create a class derived from SubmitActionBase<>  and as we want to create redirect functionality we can reuse the ActionData class from the existing redirect so it becomes derived from SubmitActionBase<RedirectActionData>.

public class CustomRedirectAction : SubmitActionBase<RedirectActionData>
{
  public CustomRedirectAction(ISubmitActionData submitActionData) : base(submitActionData)
  {
  }

  protected override bool Execute(RedirectActionData data, FormSubmitContext formSubmitContext)
  {
    Assert.ArgumentNotNull(formSubmitContext, "formSubmitContext");
    if (data == null || !(data.ReferenceId != Guid.Empty))
        return false;
    var item = Sitecore.Context.Database.GetItem(new ID(data.ReferenceId));
    if (item == null)
        return false;

    var email = string.Empty;
    var postedFormData = formSubmitContext.PostedFormData;
    var field = postedFormData.Fields.FirstOrDefault(f => f.Name.Equals("Email"));
    if (field != null)
    {
        var property = field.GetType().GetProperty("Value");
        var postedEmail = property.GetValue(field);
        email= postedEmail.ToStringOrEmpty();
    }
            
    var defaultUrlOptions = LinkManager.GetDefaultUrlOptions();
    defaultUrlOptions.SiteResolving = Settings.Rendering.SiteResolving;
    formSubmitContext.RedirectUrl = new UrlString(LinkManager.GetItemUrl(item, defaultUrlOptions)) + "?email=" + email;
    formSubmitContext.RedirectOnSuccess = true;
    formSubmitContext.Abort();
    return true;
  }
}

We start by fetching the item to redirect to - which is found in the reference id. If this is not available, we get out.

Fetching data from the submit context

Next thing to do is get the value of the email field. That was a bit tricky and I'm not sure whether I used the best approach here - I did get this idea from the Save Data code so it won't be all bad :).

The good news is that we can use the item names (of the "field" item of the form) so we shouldn't have issues with translations. And it will work for other forms if they keep the name identical (the name is not the label shown on the form by the way). Finding the field is easy as they all are a property of the posted form data available in the form submit context. But getting the data from that field was not so trivial - but the "property" stuff works.

Finalizing

As we have all our data now, we van trigger the redirect. Based on the redirect item we can construct the base url - and then add the email to it in the querystring. 

FormSubmitContext

Once the final url is known, we can set it in the form submit context. We also set the redirect property to true and abort the context. Aborting the context will prevent other actions to be executed. Our redirect should be the last.

Configuring Sitecore Forms

Once we have our code, we need to configure Sitecore Forms to use it. The configuration is done in Sitecore.

Open a content editor and go to /sitecore/system/Settings/Forms/Submit Actions. Create a new item of type Submit Action. Fill in the Model Type (e.g. Forms.CustomRedirectAction) and an error message. 

Editor

The editor field will define how your editor can configure your action. In this case we want them to be able to select an item from the content tree. We could use the existing one from the ootb redirect action, but lets create a new one..

Move to the core database and locate /sitecore/client/Applications/FormsBuilder/Components/Layouts/Actions. You will see the existing editor options there (including the RedirectToPage which has a wrong and confusing display name -Trigger Goal- at the time of writing).  As these are all editor actions that will open a content tree at a certain location, the easiest way to accomplish our needs is copy an existing tree and update the items needed - which is actually just the ItemTreeView. The StaticData field defines the root item available for your editors. You might have an issue getting the correct data in here, as the droptree on this field will show you the core database. And you want data from the master database.. switching to raw values and entering the desired guid will do the trick!


Once this is set, we can go back to the master database and finalize our submit action by selecting our newly created editor option.


That's all, your submit action should be available on your forms in the "add" list of any submit button. 

And don't forget to publish ;) 


Sitecore 9 Forms : custom validation

Sitecore 9 Experience Forms

Sitecore released a successor for Web Forms for Marketers (WFFM) with the new Sitecore 9 version, called Sitecore Forms.

Validators

Sitecore Forms comes with a few validators out of the box like email, string length, ... and of course the required field but that one is kinda special.

What if you want to validate fields with your own custom business rules?  
Lets see how we can create a validator that checks the length of the string input (based on parameters) and combines that with a regular expression validation that all characters are numeric.

Custom validator

We start by creating a new class and derive from RegularExpressionValidation. This will give us some functionality concerning the regular expression validation.

We define our class properties that we'll need to setup the validation:
public override string RegularExpression => "^[0-9]+$";
private int MinLength { get; set; }
private int MaxLength { get; set; }
Three functions need to be overridden:
  • Initialize: initializes the validator based on the validationModel object
  • Validate : server side validation based on the value
  • GetClientValidationRules : registers the client side validation rules

Code

The resulting code will look like this:
public class CustomValidation : RegularExpressionValidation
{
  public override string RegularExpression => "^[0-9]+$";

  private int MinLength { get; set; }
  private int MaxLength { get; set; }

  public CustomValidation(ValidationDataModel validationItem) : base(validationItem)
  {
  }

  public override void Initialize(object validationModel)
  {
    base.Initialize(validationModel);
    var stringInputViewModel = validationModel as StringInputViewModel;
    if (stringInputViewModel == null) return;
    MinLength = stringInputViewModel.MinLength;
    MaxLength = stringInputViewModel.MaxLength;
    Title = stringInputViewModel.Title;
  }

  public override ValidationResult Validate(object value)
  {
    if (value == null) return ValidationResult.Success;
 
    var num = value.ToString().Length;
    if (num > 0 && (num < MinLength || num > MaxLength))
    {
      return new ValidationResult(FormatMessage(Title));
    }

    var regex = new Regex(RegularExpression, RegexOptions.IgnoreCase | RegexOptions.ExplicitCapture | RegexOptions.Compiled);
    var input = (string)value;
    if (string.IsNullOrEmpty(input) || regex.IsMatch(input)) return ValidationResult.Success;
    return new ValidationResult(FormatMessage(Title));
  }

  public override IEnumerable<ModelClientValidationRule> GetClientValidationRules()
  {
    if (MaxLength > 0)
        yield return new ModelClientValidationStringLengthRule(FormatMessage(Title), MinLength, MaxLength);

    yield return new ModelClientValidationRegexRule(FormatMessage(Title), new Regex(RegularExpression, RegexOptions.IgnoreCase | RegexOptions.ExplicitCapture | RegexOptions.Compiled).ToString());
  }
}

We compile the code and publish the dll to the website, where we will add the validator to the configuration in Sitecore.

Sitecore Forms configuration

Open the Content Editor and go to the Forms section in Settings: /sitecore/system/Settings/Forms/Validations. Create a new item of type Validation (or copy an existing and update the fields).

You need to fill in the type (e.g. "Forms.CustomValidation,Forms") and a message. The message has to contain "{0}" as this will be replaced with the title of the field in the code - so e.g. {0} is not a valid entry for this field.
Also, do not forget to create a version in every language of your site and translate the message.

Now we need to attach the validator to the field types in order to make it visible when selecting a validator. Go to the Field Types section and let's take the single line text field: /sitecore/system/Settings/Forms/Field Types/Basic/Single-Line Text. Find the Allowed Validations field and your custom validator to the selected ones.


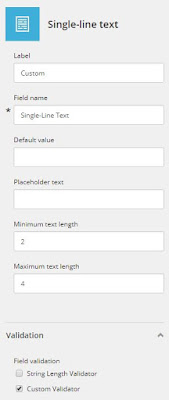
That's it..  if you now go to a form and select a single-line text field, you will be able to select your newly created validator.


ps: don't forget to publish ;)