Monday, August 15, 2016

EasyLingo 2.1: multi-site, multi-lingual and now with XP editor support

EasyLingo 2.1


EasyLingo 2.1 was just released to the marketplace. After version 1 we promised to include support for the experience editor and so we did. Kris wrote a nice post about the how-to.

Once in the experience editor, in the view tab amongst the other "bars" you can select the "Language bar" and you will get the same EasyLingo experience as in the content editor.


We also added one more (optional) version section: in Sitecore you can create versions of an item in languages that are not registered in the systems settings. These versions are now listed as well -separately- by the module. Note that these versions will always use a general flag as we cannot detect it from the system items.

More information on this great module in my previous post. You can find the code and all documentation files on GitHub.  The module itself is available on the Sitecore marketplace.


Monday, August 1, 2016

EasyLingo

EasyLingo, our first module on the Sitecore marketplace


Why

This language expansion module was designed to simplify content editing when using a large amount of languages in your Sitecore environments. When you have multiple sites with different language sets (e.g. a Belgian site in Dutch/French, a Swiss site in fr/de/it and a Danish site in dk/en) or simply a large volume of available languages, managing these languages in Sitecore can become cumbersome.

Sitecore has no out of the box functionality that restricts or manages the languages used per node/site and only offers the languages list to navigate through the available languages. The language list presented by Sitecore comprises of both those with one or more versions as well as those that have no version available or are irrelevant for that context/site.

This module was created on a Sitecore 8.1 platform together with my colleague and Sitecore MVP Kris Verheire and is now available on the Sitecore marketplace.

What

This module consists of 2 parts, which can be activated separately.

Extra languages section in the content editor


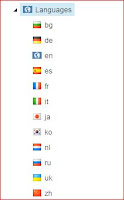
The bar consists of 3 language lists:

  • On the first line, two of the lists are displayed. On the left hand side, the first list shows all the languages that have an actual version available. 
  • The right side shows the second list with all the languages for which a fallback version exists (working through Sitecore’s item fallback available as of version 8.1). 
  • The second line hold the third list that shows languages which are available on this node/site, but for which no version exists. This line will disappear if there are no such languages.
The versions with fallback on the right are rendered in italic. The current language on the Sitecore context is visualized in bold.


Languages in all the lists are clickable so the editor can easily switch languages without having to go through the whole list.

In order to get a nice view like in the screenshots it is necessary to manually set the icons of the languages in the system section of Sitecore (as Sitecore does not use these icons anymore in the list, they are not set by default. Flag-icons are still available though).


How are “available” languages detected?

We loop through the configured sites and check whether the current item is part of it (based on the
path in the content tree and the “rootPath” of the site). For each site we check if a custom property “allowedLanguages” is available in the SiteSettings specific site node. The distinct union of all these languages will be the list of allowed languages for the item. If the list is empty, all available languages in the Sitecore instance are allowed.

How to use the “allowedLanguages” setting?

The parameter will be part of a <site /> definition (just like hostname, database, rootPath and so on). It is not obligatory – the module works perfectly without it. It can be used for multi-site solution with different languages. For our example mentioned above we could have something like:
<site name=”Belgian” allowedLanguages="nl,fr-BE" … />
<site name=”Swiss” allowedLanguages="fr,de,it" … />
<site name=”Danish” allowedLanguages="dk,en" … />
The language should match the used language exactly (so “fr-BE” ≠ “fr”) and can be completely different or overlap. For the second part of the module it is important though to put the “default” language first.

Second part: request resolver

The second part of the module consists of a request resolver that is put in the httpRequestBegin pipeline after the LanguageResolver.
The current requested URL is checked to disable the functionality for Sitecore URL’s or when not in normal page mode. The current context site is checked for the ‘allowedLanguages’ parameter. If found, and the current language is not part of the ‘allowedLanguages’ set we will redirect the user to homepage in the default language (default is the first language in the set).

Future features

The EasyLingo bar is now only available in the Content Editor. The next step would be to introduce a language bar in Sitecore’s Experience Editor that allows users to quickly switch between the available and allowed languages for the content they are editing. (is already in progress)
We are also working on adding versions of items in languages that are not listed in the system languages.

More information


Friday, July 15, 2016

Sitecore WFFM: act on success

The question I had to tackle was to change the redirect after a successful form submit based on a form value. By doing so I learned we can do a lot on success (or on error). Using Sitecore 8.1...

Success (and error) WFFM pipelines

All comes down to finding the correct pipelines - as usual in Sitecore. In our case we found a pipeline in case of success and one in case of error. But be aware: there is a big difference between the webforms and mvc solution.

Webforms

The pipelines in case of webforms are:
  • <successAction>
  • <errorSubmit>
These can be found in Sitecore.Forms.config.

Mvc

The pipelines in case of mvc are:
  • <wffm.success>
  • <wffm.error>
These can be found in Sitecore.MvcForms.config.


Custom redirect after success submit

In case of webforms, we could write a processor that redirects to the location we want and place it in the successAction pipeline as first processor (just before the original 'SuccessRedirect').

In case of MVC, it's a different story.

MVC solution 

The wffm.success is by default empty. The actual redirect happens in another pipeline later on. So redirecting here is not the right thing to do. I started writing the processor and noticed that I had a lot of information in a Sitecore.Forms.Mvc.Models.FormModel.

You have access to all the fields, and to the SuccessRedirectUrl property. At this point this is filled with the url as set in Sitecore (which is very useful as a base) and you can alter it as you please. The actual redirect will happen later but it will use the value you have set here.

Code example

public class SuccessRedirect : FormProcessorBase<IFormModel>
{
    public override void Process(FormProcessorArgs<IFormModel> args)
    {
        Assert.ArgumentNotNull((object)args, "args");
        var model = args.Model as FormModel;
        if (model == null)
            return;
         model.SuccessRedirectUrl = model.SuccessRedirectUrl + "?val=" + model.Results[0].Value;
    }
 }

This example shows you to inherit from Sitecore.Forms.Mvc.Pipelines.FormProcessorBase and implement the Process method. Cast the arguments Model property to a FormModel and start using it. I add a querystring to the redirect url with the value of the first field - sounds useless but it's just an example.

Conclusion

As often in WFFM there is a big difference between Webforms and Mvc. I tried the mvc way, and found that you can actually do a lot before Sitecore handles the model. You can change the redirect url, but there are probably also other useful possibilities here for scenarios I can't think of now...

Thursday, June 16, 2016

Sitecore Index dependencies

I recently stumbled upon a question on how to trigger re-indexing of related content in a Sitecore (Lucene) index. Different answers were given and I got the feeling that not everyone already knows about the getDependencies pipeline. So we write a blog post...

Re-index related content

As I mentioned, there are other solutions that could do the trick. 
  • Custom update strategy

    You could write your own update strategy and include your dependency logic in there. This approach has the benefit that you can use it in one index only without affecting others.
  • Custom save handler

    With a custom save handler you could detect save actions, get the dependent items and register them as well for index updating. I'm not convinced that this will work in all update strategy scenario's but if you have working code, feel free to share ;)
These are probably also valid solutions, but I'll leave those to others as I want to show the Sitecore pipeline that looks like the ideal candidate for the job.

getDependencies pipeline

There is a pipeline.. there always is. One drawback I'll mention already is that the pipeline is for all indexes and so far I have not found a way to trigger it for one index only (see update below on disabling). I also tried to get the index (name or anything) in the code but that didn't work out either. We could get the name of the job, but that was only relevant for the first batch of items - after that, multiple jobs were started and the name became meaningless. 

Anyway, the pipeline. In the Sitecore.ContentSearch.config you'll find this:
<!-- INDEXING GET DEPENDENCIES
  This pipeline fetches dependant items when one item is being index. Useful for fetching related or connected items that also
  need to be updated in the indexes.
  Arguments: (IQueryable) Open session to the search index, (Item) The item being indexed.
  Examples: Update clone references.
  Update the data sources that are used in the presentation components for the item being indexed.
-->

<indexing.getDependencies help="Processors should derive from Sitecore.ContentSearch.Pipelines.GetDependencies.BaseProcessor">
  <!-- When indexing an item, make sure its clones get re-indexed as well -->
  <!--<processor type="Sitecore.ContentSearch.Pipelines.GetDependencies.GetCloningDependencies, Sitecore.ContentSearch"/>-->
  <!-- When indexing an item, make sure its datasources that are used in the presentation details gets re-indexed as well -->
  <!--<processor type="Sitecore.ContentSearch.Pipelines.GetDependencies.GetDatasourceDependencies, Sitecore.ContentSearch"/>-->
</indexing.getDependencies>

As you can see, some processors are in the box, but in comments. You can simply enable them if you want your clones and/or datasources to be indexed with the main items.

And you can write your own processor of course. An example:
public class GetPageDependencies : Sitecore.ContentSearch.Pipelines.GetDependencies.BaseProcessor
{
    public override void Process(GetDependenciesArgs context)
    {
        Assert.IsNotNull(context.IndexedItem, "indexed item");
        Assert.IsNotNull(context.Dependencies, "dependencies");
            
        var scIndexable = context.IndexedItem as SitecoreIndexableItem;
        if (scIndexable == null) return;
            
        var item = scIndexable.Item;
        if (item == null) return;
            
        // optimization to reduce indexing time by skipping this logic for items not in the Web database
        if (!string.Equals(item.Database.Name, "web", StringComparison.OrdinalIgnoreCase)) return;
            
        if (!item.Paths.IsContentItem) return;
            
        if (item.Name.Equals("__Standard Values", StringComparison.OrdinalIgnoreCase)) return;
            
        if (Sitecore.Context.Job == null) return;
            
        // logic here - example = get first child
        if (!item.HasChildren) return;
            
        var dependency = item.Children[0];
        var id = (SitecoreItemUniqueId)dependency.Uri;
        if (!context.Dependencies.Contains(id))
        {
            context.Dependencies.Add(id);
        }
    }
}

In the example here we keep it simple and just add the first child (if any). That logic can contain anything though.

As you can see we try to get out of the processor as fast as possible. You can add even more checks based on template and so on. Getting out fast if you don't want the dependencies is important!

The benefit of the solution is that the pipeline is executed when the indexing starts but before the list of items to index is finalized - which is the best moment for this task. All "extra" items are added to the original list so they are executed (indexed) by the same job and we let the Sitecore handle them they way it was meant.

Performance might not seem an issue, but when having quite some items and dependencies, and these get updated frequently it will be. You might be triggering way too much items towards the index, so be careful (no matter what solution you go for). The indexing is be a background job but if it goes berserk you will notice.
Note that it is a good thing that your dependencies don't have to go through all kind of processes before being added, they are just "added to the list".

I found this pipeline solution very useful in scenario's where the amount of dependent items that actually got added was not too big. Don't forget you can also disable the pipeline processor temporarily (and perform a rebuild) if needed.

How to Enable/Disable 

(from the Sitecore Search and Indexing on SDN) - thx jammykam for the info

The pipeline is executed from within each crawler if the crawler’s ProcessDependencies property is set to true, which is the default. To disable this feature, add the following parameter to the appropriate index under the <Configuration /> section.
<index id="content" ...>
 ...
 <Configuration type="...">
...
 <ProcessDependencies>false</ProcessDependencies>
Alternatively, if the indexes don’t override default configuration with a local one, you can also globally change this setting in the DefaultIndexConfiguration.

Known issues with the indexing.getDependencies pipeline

https://kb.sitecore.net/articles/116076

Thursday, June 2, 2016

Sitecore WebApi missing context

Sitecore & WebApi


A lot has already been written about Sitecore and WebApi the last years since your custom WebApi calls didn't work anymore without a little tweaking. We have used the solution by Patrick Delancy a few times now and it worked fine. Until today..
Well, the issue seemed to be in the WebApi but it turned out to be something else. My journey of the day:

WebApi call is missing all Sitecore context

Our starting point was indeed a web api request that had no Sitecore context. The request looked like this: 
"http://website/api/stores/nearby/50.860421/4.422365"

First thing to do was compare configs and code with other projects where it was working, but that didn't help. All was fine there.. 
When I tried to place a language in between the domain and the path (../en/api/...) I got a 404 error from IIS. Weird. Nothing from Sitecore, although this should work. So I had my first conclusion: Sitecore is rejecting the request. 

Inspect the httpRequestBegin pipeline

I started inspecting the httpRequestBegin pipeline and noticed that it was skipped in the first step, the CheckIgnoreFlag. A custom processor placed before this step got hit, the one right behind it didn't. So I had to continue my search in.. 

The preprocessRequest pipeline

The preprocessRequest performs several checks in order to determine whether the request is valid for Sitecore. After staring at it for a while my eye fell on the dot. A simple stupid ".". The web api action was expecting 2 doubles as parameters and as this all should work find, there is a filter in this Sitecore pipeline on extensions: the FilterUrlExtensions. And of course, Sitecore is thinking that our extension is 422365 :)

The fix

Fixing this seemed very simple: just a a trailing slash to the request. And there we had our context again!

So remember when using doubles in web api request: use a trailing slash if it is your last parameter...

Sunday, May 29, 2016

Sitecore WFFM MVC FileUploadField restrictions

Sitecore WFFM FileUploadField

There are already some blogpost around about custom FileUploadFields, but as things have changed a bit in the latest Web Forms for Marketers releases and certainly with the introduction of MVC in WFFM I thought it could be useful to share the custom field we created on a Sitecore 8.1 update-1 environment with MVC forms.

Let's start by creating some validation attributes...

Validation attributes


Validation for file size


We inherit from DynamicValidationBase and override ValidateFieldValue.
[AttributeUsage(AttributeTargets.Property | AttributeTargets.Field)]
public sealed class LimitFileSizeAttribute : DynamicValidationBase
{
    private const string FileSizeLimitKey = "filesizelimit";
    private const string ErrorMessageKey = "filesizelimiterror";

    protected override ValidationResult ValidateFieldValue(IViewModel model, object value, ValidationContext validationContext)
    {
        // Required attribute should handle null value
        if (value == null)
        {
            return ValidationResult.Success;
        }

        var fileBase = value as HttpPostedFileBase;
        if (fileBase == null)
        {
            return new ValidationResult(ErrorMessage);
        }

        var fileUploadField = validationContext.ObjectInstance as FileUploadField;
        var limit = GetLimit(fileUploadField);

        if (limit == -1) // Limit not set
        {
            return ValidationResult.Success;
        }

        if (fileBase.ContentLength > limit)
        {
             return new ValidationResult(GetErrorMessage(fileUploadField));
        }

        return ValidationResult.Success;
    }
 
    private static int GetLimit(IViewModel field)
    {
        if (field == null || !field.Parameters.ContainsKey(FileSizeLimitKey))
        {
            return -1;
        }

        var parameter = field.Parameters[FileSizeLimitKey];
        int intValue;
        if (int.TryParse(parameter, out intValue))
        {
            return intValue;
        }

        return -1;
    }

    private string GetErrorMessage(IViewModel field)
    {
        if (field != null && field.Parameters.ContainsKey(ErrorMessageKey))
        {
            return field.Parameters[ErrorMessageKey];
        }

        return ErrorMessage;
    }
}

The size limit and the error message are retrieved from the parameters on the field.

Validation for allowed extensions

We can create a similar class to validate the extension by using the Path.GetExtension(fileBase.FileName). Of course, other validations are also possible.


MVC Restricted FileUploadField

We inherit from the base FileUploadField in Sitecore.Forms.Mvc.ViewModels.Fields and override the "Value" property, just to add the custom created attributes.

public class RestrictedUploadField : Sitecore.Forms.Mvc.ViewModels.Fields.FileUploadField
{
    [LimitAllowedExtensions]
    [LimitFileSize]
    public override HttpPostedFileBase Value { get; set; }
}


Register in Sitecore

The new custom field needs to be registered in Sitecore:


Usage
Now we can start using our field in a mvc form. Do not forget to fill in the necessary parameters and/or Localized parameters - in case of our example code with the file size limit these are:
  • Parameters : <FileSizeLimit>10485760</FileSizeLimit>
  • Localized parameters : <FileSizeLimitError>File size must be under 10 mb</FileSizeLimitError>

I did not present you a complete FileUpload module here, but the given examples should provide enough information to get you started in your quest to create a customized file upload field in Sitecore WFFM with MVC.

Thursday, May 26, 2016

Sitecore item buckets view settings

Item buckets and the content editor

You have probably heard and seen item buckets already. The basic information can be found on Sitecore's documentation site. In the content editor, the items in a bucket are hidden by default (the documentation shows you how to view them anyway if you want) and the editor is encouraged to use the search. After searching, the results are displayed and the editor can pick an item to edit. By default, this item opens in a tab:

The tab... nested

Once your editor has selected an item, he will get a tab with a nested view. Inside the tab is the ribbon for the current item. Although this all works, we had some editors that got confused. They used the top ribbon to start a publish, hereby publishing the whole bucket. 
So we went looking for options to tweak this, and we found them. In the box.  

Item bucket settings

At "/sitecore/system/Settings/Buckets/Item Buckets Settings" you will find a field called "Show Search Results In". The default value is "New Tab".
The options are:
  • New Tab : [default value] a selected items opens in a tab
  • New Tab Not Selected: as new tab without selection
  • New Content Editor: this might be the one you want.. it will open the selected item not in a new tab, but in a new editor window. If you are in the desktop mode, you will get this window full size and can switch between the windows through the bottom bar. In the content editor mode the new window will not be full sized when created, and will look more like an overlay.
Note that these settings are for all buckets in the system and for all users, so you might need to talk to multiple editors to ask there preference.

Enjoy, you just might have made your editors happy!