Wednesday, October 18, 2017

Sitecore 9 Forms : translating error messages

Sitecore 9 Experience Forms

Sitecore released a successor for Web Forms for Marketers (WFFM) with the new Sitecore 9 version, called Sitecore Forms.

In a multilingual environment you want to translate your forms, which is easy as the form editor itself has a language switch.  But what about the error messages - those things a visitor gets when (s)he fills in the form not as expected...

Translating error messages

Find the validators in the Sitecore Content Editor: /sitecore/system/Settings/Forms/Validations

Each validator has a Message field. Create versions of the validator item in all the languages needed and fill (or update) the message field as desired. Just check that the message is valid: the parameters in the text need to match the original value. As in the example (image) for email there is "{0}". A developer will recognize this syntax - all translations do need this token as it will be replaced by the field name when displaying the error.

Client-side messages

The messages entered here will be used for client- and server-side error messages. Which is nice. Just be aware that somewhere also jquery validation gets used and that can lead to strange situations. I noticed that the email validation can give two different error messages depending on what the error is.. and one of them is not translated as it comes from jquery. 

Translating the jquery validation is out of scope here as that is documented elsewhere and is not related to the Sitecore solution. Update: https://ggullentops.blogspot.com/2019/04/sitecore-9-forms-translating-client-error.html ;)

Required field

You might notice that the most used validation - required field - is not in the list. That is because this is a special case.. also on a Forms field, you would not select a required validator, but just tick the required checkbox. 

The code for the required field validation works in a different way and the message will come from the Sitecore dictionary. If you want to update or translate it, you need to add a key to that Dictionary. This can be done in the master database - just add an item in the /system/Dictionary - the name doesn't really matter. The key however needs to be exactly "{0} is required.". The phrase can be anything you want, just remember to add the {0} token. 

Create versions and translate in all languages needed - and don't forget to publish.

Update - password/email confirmation fields

As new fields got added in newer versions (9.3) - some new translation requirements were found. AS asked in the comments, the password & email confirmation fields seem to be special cases as well. How to translate them was mentioned on Sitecore StackExchange (https://sitecore.stackexchange.com/q/24129/237): just add "The {0} and {1} do not match." to the dictionary as well.

Sitecore 9 Forms: custom submit action

Sitecore 9 Experience Forms

Sitecore released a successor for Web Forms for Marketers (WFFM) with the new Sitecore 9 version, called Sitecore Forms.

Submit actions - save actions

Sitecore Forms comes with a few submit actions (or save actions as we used to call them, or how they are still called on the submit button) out of the box like Trigger Goal, Redirect to Page, Save Data ... but is also missing a few and developers will probably -just as with wffm- need to make custom ones.

Custom redirect

I wrote a post on Sitecore 8 about customizing the redirect url. In Sitecore 9 with Forms, that article is no longer valid as we should use a different approach and use a custom submit action. So lets try to do that: create a submit action that redirects to a page and adds the value of a field (e.g. email) to the querystring to be processed on the results page.
Could become useful as there is no ootb option for a success message anymore.


The code

Let's go straight to the good stuff. We'll create a class derived from SubmitActionBase<>  and as we want to create redirect functionality we can reuse the ActionData class from the existing redirect so it becomes derived from SubmitActionBase<RedirectActionData>.

public class CustomRedirectAction : SubmitActionBase<RedirectActionData>
{
  public CustomRedirectAction(ISubmitActionData submitActionData) : base(submitActionData)
  {
  }

  protected override bool Execute(RedirectActionData data, FormSubmitContext formSubmitContext)
  {
    Assert.ArgumentNotNull(formSubmitContext, "formSubmitContext");
    if (data == null || !(data.ReferenceId != Guid.Empty))
        return false;
    var item = Sitecore.Context.Database.GetItem(new ID(data.ReferenceId));
    if (item == null)
        return false;

    var email = string.Empty;
    var postedFormData = formSubmitContext.PostedFormData;
    var field = postedFormData.Fields.FirstOrDefault(f => f.Name.Equals("Email"));
    if (field != null)
    {
        var property = field.GetType().GetProperty("Value");
        var postedEmail = property.GetValue(field);
        email= postedEmail.ToStringOrEmpty();
    }
            
    var defaultUrlOptions = LinkManager.GetDefaultUrlOptions();
    defaultUrlOptions.SiteResolving = Settings.Rendering.SiteResolving;
    formSubmitContext.RedirectUrl = new UrlString(LinkManager.GetItemUrl(item, defaultUrlOptions)) + "?email=" + email;
    formSubmitContext.RedirectOnSuccess = true;
    formSubmitContext.Abort();
    return true;
  }
}

We start by fetching the item to redirect to - which is found in the reference id. If this is not available, we get out.

Fetching data from the submit context

Next thing to do is get the value of the email field. That was a bit tricky and I'm not sure whether I used the best approach here - I did get this idea from the Save Data code so it won't be all bad :).

The good news is that we can use the item names (of the "field" item of the form) so we shouldn't have issues with translations. And it will work for other forms if they keep the name identical (the name is not the label shown on the form by the way). Finding the field is easy as they all are a property of the posted form data available in the form submit context. But getting the data from that field was not so trivial - but the "property" stuff works.

Finalizing

As we have all our data now, we van trigger the redirect. Based on the redirect item we can construct the base url - and then add the email to it in the querystring. 

FormSubmitContext

Once the final url is known, we can set it in the form submit context. We also set the redirect property to true and abort the context. Aborting the context will prevent other actions to be executed. Our redirect should be the last.

Configuring Sitecore Forms

Once we have our code, we need to configure Sitecore Forms to use it. The configuration is done in Sitecore.

Open a content editor and go to /sitecore/system/Settings/Forms/Submit Actions. Create a new item of type Submit Action. Fill in the Model Type (e.g. Forms.CustomRedirectAction) and an error message. 

Editor

The editor field will define how your editor can configure your action. In this case we want them to be able to select an item from the content tree. We could use the existing one from the ootb redirect action, but lets create a new one..

Move to the core database and locate /sitecore/client/Applications/FormsBuilder/Components/Layouts/Actions. You will see the existing editor options there (including the RedirectToPage which has a wrong and confusing display name -Trigger Goal- at the time of writing).  As these are all editor actions that will open a content tree at a certain location, the easiest way to accomplish our needs is copy an existing tree and update the items needed - which is actually just the ItemTreeView. The StaticData field defines the root item available for your editors. You might have an issue getting the correct data in here, as the droptree on this field will show you the core database. And you want data from the master database.. switching to raw values and entering the desired guid will do the trick!


Once this is set, we can go back to the master database and finalize our submit action by selecting our newly created editor option.


That's all, your submit action should be available on your forms in the "add" list of any submit button. 

And don't forget to publish ;) 


Sitecore 9 Forms : custom validation

Sitecore 9 Experience Forms

Sitecore released a successor for Web Forms for Marketers (WFFM) with the new Sitecore 9 version, called Sitecore Forms.

Validators

Sitecore Forms comes with a few validators out of the box like email, string length, ... and of course the required field but that one is kinda special.

What if you want to validate fields with your own custom business rules?  
Lets see how we can create a validator that checks the length of the string input (based on parameters) and combines that with a regular expression validation that all characters are numeric.

Custom validator

We start by creating a new class and derive from RegularExpressionValidation. This will give us some functionality concerning the regular expression validation.

We define our class properties that we'll need to setup the validation:
public override string RegularExpression => "^[0-9]+$";
private int MinLength { get; set; }
private int MaxLength { get; set; }
Three functions need to be overridden:
  • Initialize: initializes the validator based on the validationModel object
  • Validate : server side validation based on the value
  • GetClientValidationRules : registers the client side validation rules

Code

The resulting code will look like this:
public class CustomValidation : RegularExpressionValidation
{
  public override string RegularExpression => "^[0-9]+$";

  private int MinLength { get; set; }
  private int MaxLength { get; set; }

  public CustomValidation(ValidationDataModel validationItem) : base(validationItem)
  {
  }

  public override void Initialize(object validationModel)
  {
    base.Initialize(validationModel);
    var stringInputViewModel = validationModel as StringInputViewModel;
    if (stringInputViewModel == null) return;
    MinLength = stringInputViewModel.MinLength;
    MaxLength = stringInputViewModel.MaxLength;
    Title = stringInputViewModel.Title;
  }

  public override ValidationResult Validate(object value)
  {
    if (value == null) return ValidationResult.Success;
 
    var num = value.ToString().Length;
    if (num > 0 && (num < MinLength || num > MaxLength))
    {
      return new ValidationResult(FormatMessage(Title));
    }

    var regex = new Regex(RegularExpression, RegexOptions.IgnoreCase | RegexOptions.ExplicitCapture | RegexOptions.Compiled);
    var input = (string)value;
    if (string.IsNullOrEmpty(input) || regex.IsMatch(input)) return ValidationResult.Success;
    return new ValidationResult(FormatMessage(Title));
  }

  public override IEnumerable<ModelClientValidationRule> GetClientValidationRules()
  {
    if (MaxLength > 0)
        yield return new ModelClientValidationStringLengthRule(FormatMessage(Title), MinLength, MaxLength);

    yield return new ModelClientValidationRegexRule(FormatMessage(Title), new Regex(RegularExpression, RegexOptions.IgnoreCase | RegexOptions.ExplicitCapture | RegexOptions.Compiled).ToString());
  }
}

We compile the code and publish the dll to the website, where we will add the validator to the configuration in Sitecore.

Sitecore Forms configuration

Open the Content Editor and go to the Forms section in Settings: /sitecore/system/Settings/Forms/Validations. Create a new item of type Validation (or copy an existing and update the fields).

You need to fill in the type (e.g. "Forms.CustomValidation,Forms") and a message. The message has to contain "{0}" as this will be replaced with the title of the field in the code - so e.g. {0} is not a valid entry for this field.
Also, do not forget to create a version in every language of your site and translate the message.

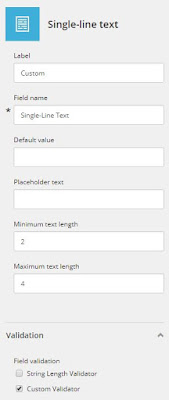
Now we need to attach the validator to the field types in order to make it visible when selecting a validator. Go to the Field Types section and let's take the single line text field: /sitecore/system/Settings/Forms/Field Types/Basic/Single-Line Text. Find the Allowed Validations field and your custom validator to the selected ones.


That's it..  if you now go to a form and select a single-line text field, you will be able to select your newly created validator.


ps: don't forget to publish ;)

Tuesday, April 25, 2017

How to add a custom rendering in all your future Sitecore SXA sites

Sitecore SXA and custom renderings

There are already blogs about how to create custom renderings in Sitecore SXA. The official Sitecore documentation site has an article on how to create your rendering and add it to the toolbox. You can read on my own blog how to do this with variants.

In short, the steps are:
  • Create a rendering (controller, action method, repository ...)
  • Create a controller rendering in Sitecore
  • Add a new rendering to the toolbox

Once you completed these steps you will have a new component in the toollbox for your site. But a Sitecore instance with SXA will probably host multiple sites, so what if you created a rendering that you want to use on all your future SXA sites? I found some information on that and would like to share it, using an existing component as example to show you how to create your own. This will also show that it is possible to add your rendering to the existing component groups in SXA, but that might be not such a good idea considering that upgrades of SXA might remove your additions. And of course, you don't want to mix features.

Adding your rendering to the available components of new SXA sites

First step is to open the Sitecore content editor. I will use the "Page Content" renderings group to show what you can do as this is one with some nice examples.

Branch Template

First thing to do is to create a branch template that will create the item(s) needed to make our component(s) available when a new site is generated. Go to /sitecore/templates/Branches/Feature/Experience Accelerator and you will find already quite some folders with branch templates for the existing components. As we are using Page Content as example, lets check that folder:

The folder contains a few branches, but we'll focus on the Available Page Content Renderings now. This is the branch template that will be used to create the item with the renderings that are included in the "Page Content" rendering group - you'll find all of them in the $name item in the branch. 

To create your own you need to define a new branch template just like it with a proper name. If you just want to add your rendering to an existing group, you can simply add it to the proper branch template and your done - you don't need any further steps in that case but be aware that updates might delete your addition (of course, this is easily checked and re-added if needed).

Site Setup


If you created your own branch to have your own rendering group, go to /sitecore/system/Settings/Feature/Experience Accelerator. You will recognize the folders there for all the default rendering groups and you should create your own here.

First item in the folder is a "Site Setup" item, where we can define the name of the group and whether it is checked by default (or installed by default).

The Site Setup has several children - steps that will be taken during setup. The first ones you can see in the Page Content example are all of type "AddItem" (/sitecore/templates/Foundation/Experience Accelerator/Scaffolding/Actions/Site/AddItem)

AddItem

Let's take the first one as example as this is the most interesting one:

Add Available Renderings

In the AddItem item, you choose a location and a template (and a name). To add the available renderings -what is our main purpose here-, we take the Available Renderings parent as location and use our branch template as Template - the one you created in the first step.

This will tell the SXA site creation script to create a new item based on the branch template at the set location. 

Data items

You can use the same AddItem to create other items as well, like a data folder (including data items if you want). The Page Content has examples on that using other branch templates. 

Rendering variants

If your rendering can make use of variants, you should also create the items for that. The Page Content has examples on empty variant folders (like Field Editor) or variant folders with a default variant (like Page List) where again a branch template is used to create all the necessary items.

Other instances

But what about other instances? Yes, indeed - we have been talking about SXA sites within the same instance here. That covers quite some scenarios, but if you want to have this in other instances with SXA as well you can easily package your stuff and tranfer it - after all, we did nothing more than manipulating items in Sitecore...

Conclusion

Adding your own components is quite powerful but still fairly easy if you know which steps to take. Just adding the renderings can be done with the steps provided here, but I'm sure they are more possibilities to discover by looking at the existing features (e.g. adding to the theme, which you can check in the search feature). And that is the best advice I can give you: take a look at the existing features and you'll discover the fancy world of SXA ;)

Wednesday, April 19, 2017

Sitecore SXA: PageList component with an Item Query

Sitecore Experience Accelerator (SXA) PageList component & Item Queries

Our requirement was simple: 
Display a set of fields from a list of items, based on a single template under a root item.
We checked the available components in SXA to see if we could do this in a decent way (and without any custom code) and found the PageList component:
Displays lists of pages by predefined or composed queries.

Item Queries as from SXA 1.3

We are using SXA 1.3 and in that version we can define Item Queries in the Settings of the site:


As you can see here we created an Item Query called "Speakers".
We used the "Build query" option on the Query field to create a query to select the desired template at a location. We could extend this with more clauses if needed.

The query build tool looks very familiar to editors who are used to work with the search tools in Sitecore and creates a search index query. You can see the resulting query in the Crawling log file.


Page List

The Page List component has a few options to determine the resulting items. 

Datasource

The "datasource" field also has a "Build query" option. Our first attempt was actually to use this to build our entire query but that failed as we did get multiple results and Sitecore does not like that in the Datasource field. So you have the options to simply select a single item as source or use a query to determine the datasource (but make sure that query does not return more than 1 item or the control will fail). You can combine the item datasource with a query (like the predefined "Children"). 

But in our case we didn't need a datasource as we had set everything on the query - not exactly sure how everything is handled behind the scenes, but as far as I could see they used a combination of the datasource and the query so a single index query seems a better option here.

Source Type

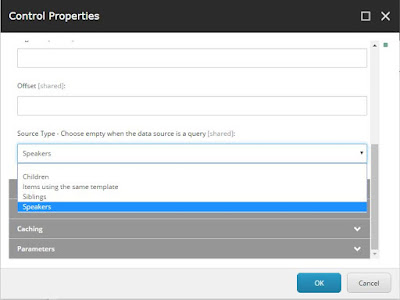
This is the option we did use - by creating our "item query" we added a new option to this dropdown (next to the standard ones):
We select our item query "Speakers" as source type. Save, publish, ..  and there is our list with the exact items we wanted.


Fields - Variants

In order to display the fields we want in the list, we can use Variants. How to create a variant is explained on the Sitecore doc site. In short:

  1. Go to /sitecore/content/[tenant folder/tenant/site/...]/Presentation/Rendering Variants/Page List
  2. Create a new Variant Definition
  3. Add all the VariantFields you want (mark them as link if you want them to link to the underlying item - for a page list you probably want at least one of them to do so)
  4. Select your newly created variant in the Styling properties of the control on your page

Credits

Thanks to Dawid (daru) & Adam (adamnaj) for the support on Sitecore Slack - the SXA channel there is a real good place to get help!  Next to Sitecore Stack Exchange of course, already having 58 questions on the SXA tag as we speak (and apparently even one where item queries are covered - d'oh).

Thursday, March 23, 2017

Sitecore SXA: using variants to create a list with images and links

A small post with an example on how to tweak SXA to get what you need without any code..


The requirement

We had to create a list of images that had a link on them to an internal or external page.
We couldn't use the default "Link List", as that had no image options..  We couldn't use the "Gallery" as that has no links..

Our solution

Template

We started by creating a new template for datasource items, inheriting from the existing "Link" template (/sitecore/templates/Feature/Experience Accelerator/Navigation/Datasource/Link) in the Navigation feature.


We called it ImageLink and added one field: Image (placed it in the Link section so it would be combined with the existing Link field on our base -Link- template. 

Variant definition

For the Link List component, we added a new Variant definition.

We called it "Imaged" and added just one VariantField for the image with properties:
  • Field name: "Image"
  • Is link: checked 
In order to get the link using the link field as source, we filled in the name of the field containing the link ("Link") in the field "Field used as link target" on the variant definition itself.

Don't forget to select the allowed templates in the variant definition ;)

Link List variant

Now we can add a Link List on our page and select the "Imaged" variant. And that is it actually.. save, publish, ...  and magic!
Here is our output:


A list with links and images - just what we needed. We can also use the (optional) title from the Link List and other inherited features.

And we didn't write any code. 

Scary...

Thursday, March 9, 2017

Variants on your custom Sitecore SXA renderings

Sitecore Hackathon 2017

One of the possible ideas of the 2017 Sitecore Hackathon was the Sitecore Experience Accelerator (SXA). With our "No Weekend 4 Us" team we took this challenge and created a custom component that works with SXA Variants (and did other fancy stuff, but that will be explained in another blog post). [Using SXA 1.2 on Sitecore 8.2-upd2]

Sitecore Experience Accelerator Variants

SXA comes with a set of default renderings and rendering variants. Rendering variants are configurable adaptations of the default renderings. To further encourage reusability, you can also create new rendering variants. This gives authors more options in the way they present their content.
Info on creating variants can be found on the SXA dev documentation, but what if you create a custom component for SXA and want to use this technology as well. I'll try to provide a step by step overview of the things to do. Our component was about blogs, so you might find that in the code examples...

Variant model repository

We created a repository based on the VariantsRepository of SXA:
using Sitecore.XA.Foundation.RenderingVariants.Repositories;

public class BlogVariantRepository : VariantsRepository, IBlogVariantRepository
{
  public T GetModel<T>(object model) where T : IRenderingModelBase
  {
    FillBaseProperties(model);
    return (T)model;
  }
}
The reason to do this is to get a variants-aware model later on. The repository has an interface, so we will inject it with dependency injection. We will do this the SXA way, by using their <ioc> pipeline.

Dependency Injection

<pipelines>
  <ioc>
    <processor type="X.Features.Blog.Pipelines.IoC.RegisterBlogServices, X.Features.Blog" />
  </ioc>
</pipelines>
public class RegisterBlogServices : IocProcessor
{
  public override void Process(IocArgs args)
  {
    args.ServiceCollection.AddTransient<IBlogVariantRepository, BlogVariantRepository>();
    ...
  }
}
We are using build-in DI of Sitecore 8.2 as used by SXA this way. It's actually a very easy way to insert your stuff to the container. As an extra there is no need to register your controller - SXA will take care of that for you.

Model - View - Controller


Model

Let's start with the model. 
public class BlogsModel : VariantsRenderingModel
{
    ..  // custom properties
}
The model inherits from the VariantsRenderingModel. This base class provides some interesting (and needed) properties. It actually is the RenderingModelBase (with info on Item, Rendering ...) extended with VariantFields. We will use the model repository we created earlier to fill the properties of this base class. Of course, it can be extended with any properties and function.

Controller

public class BlogsController : VariantsController
{
  private readonly IBlogVariantRepository blogVariantRepository;
  ...

  public BlogsController(IBlogVariantRepository blogVariantRepository, ...)
  {
    this.blogVariantRepository = blogVariantRepository;
    ...
  }

  public ActionResult BlogList()
  {
    var model = blogVariantRepository.GetModel<BlogsModel>(new BlogsModel());
    model.X = ...;
    return View(model);
   }
}
The controller inherits from VariantsController. Our repository is injected as explained earlier. We call the GetModel on our repository to get our base model with filled base properties. We can set values for other custom properties on the retrieved model object.

View

<div @Html.Sxa().Component("bloglist", Model.Attributes)>
  <div class="component-content">
    <div class="blog-list">
      @foreach (var item in Model.Blogs)
      {
        <div data-itemid="@item.Blog.ID.Guid">
        @foreach (var variantField in Model.VariantFields)
        {
          @Html.RenderingVariants().RenderVariant(variantField, item.Blog, false)
        }
        </div>
      }
    </div>
  </div>
</div>

This is just an example of what might be possible in the view - a bit more bound to the model we used as a test (with a list of blogs and each blog object included the underlying Sitecore item).

You can see here that we loop over all variant fields and simply display them. This means of course that we need a default variant to show anything.

That's it for the code.. now lets move on to Sitecore.

Sitecore (SXA) configuration

Rendering parameters template

First step is to create a rendering parameters template to use for your rendering. The template should inherit from /sitecore/templates/Foundation/Experience Accelerator/Rendering Variants/Rendering Parameters/IComponentVariant (don't forget to also inherit /sitecore/templates/System/Layout/Rendering Parameters/Standard Rendering Parameters instead of the Standard Template).

Using this base template will give you the variants dropdown in the rendering properties. By the way, SXA has a similar base template for Styling (/sitecore/templates/Foundation/Experience Accelerator/Presentation/Rendering Parameters/IStyling).


Rendering

In /sitecore/layout/Renderings/Feature/Experience Accelerator/[Feature-Name]/[Rendering-Name] create a Controller Rendering and fill in the usual fields (Controller, Action ..). And a tip to make it complete: give your rendering an icon ;)

To make the rendering available in the toolbox, go to the Presentation part of the SXA website (will be on the same level as the Home page). Under Available Renderings create a new Available Renderings item (might want to name if like your feature again). Add your newly created rendering in the "Renderings" box. Now we have a rendering in the toolbox - lets continue by creating the variants we need.

Variants

Variants are also defined in the "Presentation" section of your site. Under Rendering Variants create a new Item of type Variants and name it exactly as your rendering (important!). Under this Variants, create a Variant Definition. You might want to call the first one "default". Under the Variant Definition, create an Item of type Field. Choose a tag (e.g. "div"), fill in the Field name and set the other fields as desired (e.g. check "Is link" if you want a link to be generated on the field). Continue creating "Fields" as much as you want. And that is it. When you add the rendering from the Toolbox, you will see your variant in the dropdown and all the fields you created will be rendered. 

To make it really useful, you might want to create more Variant Definitions with different sets of Fields. This way you can easily create different outputs of the same rendering (and even more if you combine this with Styling).

More information on what you can do with the variants and their properties in the link mentioned above on the Sitecore doc site.

ps: thx to Dawid Rutkowski for pointing us in the right direction!

Wednesday, March 1, 2017

Local datasources on standard values with branch templates

Local datasources module

The local datasource module on the Sitecore marketplace has a second version. The first version managed to create local datasource items when editing in the experience editor. In this second version we anticipated on renderings that are added by default on a template.

Branch templates with "standard values"

The idea was simple: 
  1. create a branch template based on the page template
  2. edit the created item (in the branch template - probably called $name) in the experience editor
  3. add a rendering with a local datasource (the local datasource module will create the children - a data folder and the datasource item)
  4. repeat 4 if wanted (add more renderings)
  5. use the branch template when creating items
Sounds simple, but of course when creating the items the datasource value of the rendering is still set to the item in the branch templates section - not to the child item we just created.

To fix that we added some code that I'll explain here. Code can be found on GitHub.

Event

I used the item:added event and not the item:created event. We need to be able to detect whether the item was created from a branch and can use the BranchId property of the Item for that. The item:created event however comes too soon to do that as the BranchId is not yet set at that moment. In the item:added event, we can check the BranchId. 

So we create a handler to add to item:added and patch it as first handler: patch:before="*[1]".

OnItemAdded

Our main function starts with some checks to get out as fast as possible when it is not applicable. When it is, we call our action method for the current item and all descendants. 
In case of a branch, the item:added event is called only once for the main item. 
But as this is a branch, we might also have a child with local datasources set. So we check all children - they are already created at this time.

Correct the datasources

For each item with a layout (item.Visualization.Layout != null) we grab the renderings and change the datasource value if it should be local.
var layout = LayoutDefinition.Parse(item[Sitecore.FieldIDs.LayoutField]);
var devices = layout.Devices;
var changed = devices.Cast<DeviceDefinition>().Sum(device => SetDatasourcesToLocal(device, item));
if (changed > 0)
{
    UpdateLayout(item, layout, Sitecore.FieldIDs.LayoutField);
}
We use the Parse method to get a LayoutDefinition of the "Shared layout" field. This does mean indeed that we only cover renderings placed on the shared layout. Doing the same for a rendering on the final layout is for a future version...

We loop through the devices and call a function to change the datasource values. This function loops over all renderings and checks the datasource item. If the datasource items path starts with /sitecore/template we know this was meant to be a local one. To find the correct local item, we explicitly go into the local data folder because a search over all descendants might also find a similar datasource item on another page in the branch. Once found, we set the value to the rendering in the layout.

Saving the changes

We keep track of the changes made because they are not automatically saved back into the item. The "layout" object has all the changes, but the item does not. So if we had any changes, we save the new value back into the shared layout field:
item.Editing.BeginEdit();
item.Fields[Sitecore.FieldIDs.LayoutField].Value = layout.ToXml();
item.Editing.EndEdit(false, false);

Conclusion

Version 2 is now published on the marketplace, and to be honest version 3 will not be for any time soon. But if you like the module, I'm always open for comments, ideas and contributions...

Enjoy the local datasources!

Tuesday, February 14, 2017

Local Datasources module for Sitecore Experience Editor

Local Datasources marketplace module

On the Sitecore marketplace a new module was recently added to help editors with the concept of "local" datasources. The module can be found here

The source code is available on GitHub. Instruction on installing and using the module are included in the readme file.

We assume people working with Sitecore and reading this know what datasources are. Some of you might even work with a "local" datasources. Local meaning that the datasource item is coupled with the "page" item where it is used in a hierarchical way by storing the datasource item underneath the page item - in a "local" data folder.

We tried to automate this proces for datasources that should not be shared amongst "pages" while working in the Experience Editor.

The solution now consists of 2 parts.
  • The first part will create the actual datasource item (and the data folder if that does not yet exists - datafolder will be pushed as latest child). The template name of the required datasource is used as base for the item name, combined with a number.
  • A second part will prevent the "Select the associated content" dialog from appearing and is discussed already in a previous post: Preventing the Sitecore "select datasource" dialog.

I wrote another blog about the functionalities of the module - here I will go deeper into the code.

Creating the datasource

Creating the datasource item is done in a processor in the getRenderingDatasource pipeline. This pipeline is started within the AddRendering command (see step 2 - the dialog). 

We check the datasource location of the rendering and determine whether it is "local". If so we start the item creation:
  1. Create the parent item for the datasource item if it does not exist 
    • based on a provided template
    • underneath the context item, and pushed down to the last child position
    • name is based on the datasource location (we should add some more data verification here)
  2. Add this parent item to the datasource roots
  3. Create the datasource item underneath the parent
    • based on the template set on the rendering as datasource template
    • using this template name of the datasource as base for the item name (combined with a number)
  4. Set the datasource item FullPath as CurrentDatasource in the pipeline arguments

A few things to notice here:
  • We use a SecurityDisabler to make sure the item can be created.
  • We use a SiteContextSwitcher (to "system") to make sure the page does not refresh (if you don't do this, the page detects a new item and refreshes - causing errors)

The datasource dialog

You can read here how we prevented the dialog from appearing and still setting the datasource value when the arguments were set correctly in the previous step using a custom AddRendering command.

As we do override the AddRendering command, the module needs a Sitecore version with the exact same code as the one we used in that command to keep all renderings without local datasources to work as expected.

The Sitecore Experience Accelerator (SXA) has it's own version of the AddRendering command - for the same reason btw. 
This means that this module should not be installed on instances were SXA is also present!
A future enhancement could be to add SXA support to the module, although it might be a better option to try to use SXA functionality in your non-SXA site - but that is a whole other story...

Future enhancements

We released this module as version 1.0.  It is working on Sitecore 8.2 and has some functionalities already but we are aware that there are still quite some areas of improvement. As mentioned here before, we might need to add some extra data checks to be more robust. But also on a functional level we still have ideas:
  • a solution for renderings that are already set on the standard values of a template (using branches maybe?)
  • remove datasource items if the rendering is removed (and no other links are found)
  • content editor support? (although we're not quite sure we actually want this)
Feel free to use the module, share more ideas for enhancements, contribute to the code...

Saturday, February 4, 2017

Preventing the "Select Datasource" dialog in the Sitecore Experience Editor

Select the Associated Content dialog

Every editor working in the Sitecore Experience Editor has undoubtedly seen this screen before:

The dailog lets you select a Datasource for a rendering. Or create a new one...  The dialog will appear if your rendering has a datasource location set on its definition item:


But now we had a case where we wanted this dialog not to appear. The datasource was set in a custom processor in the getRenderingDatasource pipeline so it was already available. The dialog knows about this value as it will select it by default for you but it still appears.

Rendering "Data source" field

A first attempt was successful by accident. Wouldn't be the first achievement made like this... If a datasource is set in the "Data source" field of the rendering definition item, the dialog will not appear. Due to a flaw in the code setting the datasource the value was written there instead of the actual item containing the rendering. Works like a charm! But not thread safe. You only need two editors to place that rendering at the same time and your datasources will get mixed up. 

The AddRendering command

With a little help we found the right command to override (thanks to Support and Alan Płócieniak): webedit:addrendering.

It is quite obvious the class is not meant to be overridden, so you might need a debugging tool to get it all right. Let's start by creating a class that overrides the Sitecore.Shell.Applications.WebEdit.Commands.AddRendering. The function we need is "void Run(ClientPipelineArgs args)".  Best start is to copy the code from the original class and get rid of the function you do not need. As you will notice (I am writing based on Sitecore 8.2 initial btw) you do need to keep a few private functions in your own code as well to keep the "Run" function working.

In the Run-code, locate the call to the getRenderingDatasource pipeline:
CorePipeline.Run("getRenderingDatasource", renderingDatasourceArgs);

Just below you'll see
if (!string.IsNullOrEmpty(renderingDatasourceArgs.DialogUrl) && !AddRendering.IsMorphRenderingsRequest(args))

  {
    ...
    args.Parameters["OpenProperties"] = flag.ToString().ToLowerInvariant();
    SheerResponse.ShowModalDialog(renderingDatasourceArgs.DialogUrl, "1200px", "700px", string.Empty, true);
    args.WaitForPostBack();
  }

This is the spot where the dialog would open. As we don't want this, we add an if-statement within the if-statement from above:

if (!string.IsNullOrEmpty(renderingDatasourceArgs.DialogUrl) && !IsMorphRenderingsRequest(args))
  {
    if (!string.IsNullOrEmpty(renderingDatasourceArgs.CurrentDatasource))
    {
      var datasourceItem = Client.ContentDatabase.GetItem(renderingDatasourceArgs.CurrentDatasource);
      WebEditResponse.Eval(FormattableString.Invariant(
           $"Sitecore.PageModes.ChromeManager.handleMessage('chrome:placeholder:controladded', 
              {{ id: '{itemNotNull.ID.Guid.ToString("N").ToUpperInvariant()}', 
                 openProperties: {flag.ToString().ToLowerInvariant()}, 
                 dataSource: '{datasourceItem.ID.Guid.ToString("B").ToUpperInvariant()}' }});"));
    }
  ...
  }

What are we doing here? First we check if the datasource was set in the arguments before. If so, we want our code and no dialog anymore. We fetch the datasource item from the content database. And then the magic: we send the message to Sitecore editor that the control was added, just the way it does when a rendering was completely set (see the code a few lines below in the original AddRendering). The trick is to make sure all parameters are set correctly:

  • the ID of the rendering that was added as digits ("N")
  • a value indicating whether the properties window should be opened - this is true/false and is send without any quote
  • the ID of the datasource item as guid with braces ("B")
If any of the parameters are faulty, you will get an error on the call to "Palette.aspx" and the rendering will not be added (you will also see an error popup in the browser).

As we send the value for the properties window as for all other renderings, we can keep that functionality as is. It will react on the value set when the rendering was selected (which can be tweaked on the rendering definition item itself if you don't want to leave that choice to your editors).

Configuration

You need to tell Sitecore you have a new AddRendering command. Patch the config by creating a new config file in the include folder (make sure it gets added in the end):
<configuration xmlns:patch="http://www.sitecore.net/xmlconfig/">
  <sitecore>
    <commands>
      <command name="webedit:addrendering" type="YourNamespace.YourClass, YourSolution" patch:instead="*[@name='webedit:addrendering']" />
    </commands>
  </sitecore>
</configuration>

Wrap it up


This code will probably (as it was for me) be a part of a bigger solution and is not a fully working code set. If you have any questions, you can find me on Sitecore Slack or sitecore.stackexchange.com ;)

One question that apparently does pop up is how to set the datasource. Setting the datasource when a rendering is added can be done in the getRenderingDatasource pipeline, which is called in the command as we saw. Create an extra processor and add the datasource item to the arguments:
getRenderingDatasourceArgs.CurrentDatasource = datasourceItem.Paths.FullPath;

One thing to remember though: as we did overwrite some piece of Sitecore code here, you do need to check on every upgrade that all is still valid and you might need to adapt the code.